
This year I decided I wanted to do a garden. We have tried to do a garden in the past and it often ends in a weedy rotting vegetable mess. This year, I decided to take a smaller approach to my garden with a raised garden attempt.
Our summers get so incredibly busy especially now with two boys in travel baseball and another child who is almost done with Pee Wee baseball along with just normal life and work! In the past we have tried to do too big of a garden, in my opinion, which has contributed to the overwhelming aspect of gardening. There was also the issue of a water source. The hose would have to be dragged quite a ways to the garden. When we would come home after 9 p.m. after a baseball game, we just wouldn’t have any energy left for the garden.
It wasn’t all a failure. We did can around 20 cans of tomatoes and we had a successful eggplant once. However, it wasn’t the grandiose plan we had in mind. We haven’t even attempted a garden in the past few years and our traditional garden in the backyard has now creeped back to grass. I decided to try my hand at the raise garden bed especially after I found a deal on this at Home Depot. I was able to get mine for $29.99 each shipped but the prices are normally $39.99. You can find these at places like or Amazon.com. If you are handy, you can find a easy tutorial online to make your own, which would save you even more money.
I didn’t feel that handy and the deal on the shipped to my home sounded like a great idea. It was super simple to put together. I was able to put together two of these in about 15-20 minutes.
After these were put together, I made a trip to Menards to get my soil!
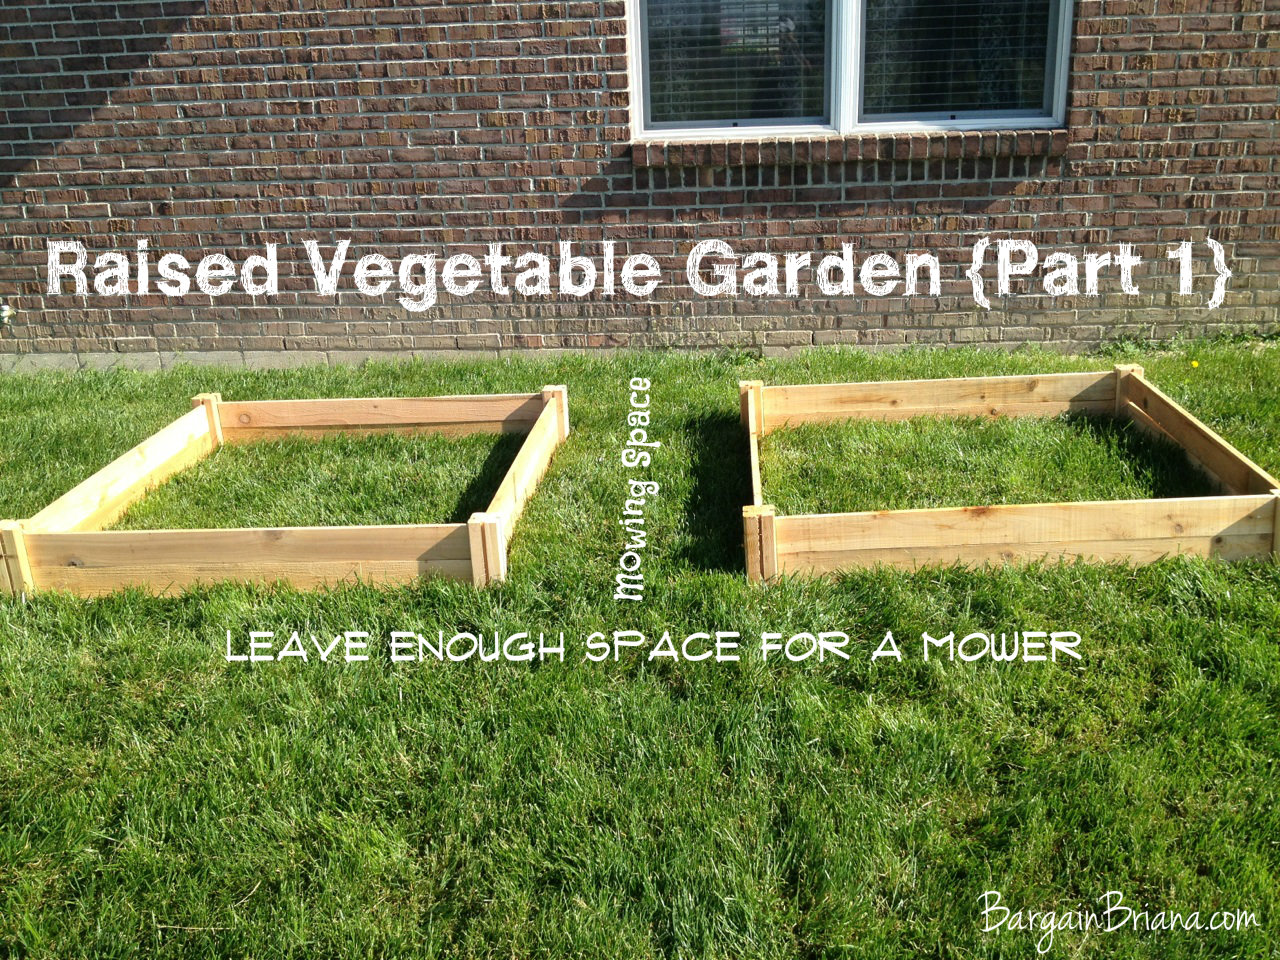
Updated to add: If you are going to do multiple beds, makes sure you leave enough space between the two of them and your home to get a lawnmower through it! I didn’t do this and have had to hear about it every time the boys mow! :) (Lots of you left this comment too as a suggestion! Too late for me but hopefully not too late for others!)
Read the next post: {Raised Bed Gardening Part 2} Putting Together the Soil
Read more:
- {Raised Bed Gardening Part 1} Putting Together the Raised Beds
- {Raised Bed Gardening Part 2} Putting Together the Soil
- {Raised Bed Gardening Part 3} Planting, Planting, Planting
- {Raised Bed Gardening Part 4} What’s Growing?
- 5 Water Features You Can Try This Weekend
- 10 Tips for Organic Gardening
- Frugal Gardening Tips
- Gardening With Kids
- Create a Lasagna Garden
- Create a Salsa Garden
If you haven’t put your soil in already you may want to consider removing the grass in and around the beds first. There’s a chance a thick layer of soil will smother the grass and turn it into “green manure” but there’s a high risk that the grass will survive and find its way to the surface. Removing it from around the beds will also prevent it from trying to creep its way in.
Some cedar mulch on the outside the beds will help control weed creep makes a nice foot path but I would advise against using it in the beds themselves unless you are planting only potted plants from a nursery. The natural chemicals in cedar that make it rot resistant can also inhibit growth in young plants.
Once my plants are established I don’t do a lot of heavy weeding unless its a particularly aggressive weed that’s threatening to overtake a crop. Some weeds can even enrich the soil or encourage beneficial insects.
Clover, for example, is a legume so it adds nitrogen to the soil and it’s flowers encourage pollinators to visit the garden. It also shades the soil, which delays evaporation and blocks sunlight to the seeds and sprouts of more troublesome weeds.
I’m told that layers of newspaper make a good grass barrier. http://landscaping.about.com/od/alternativestograss/a/how_kill_grass.htm
Congrats on the raised garden beds! I just wanted to leave you a quick tip. If your going to have 2 or more raised garden beds, then I suggest that you measure the distance between them… make sure that your lawn mower and weed wacker will fit between them and all the way around them. I made the mistake of putting 2 of them to close together, and not far enough away from my shed, so I had to use the weed wacker instead of the lawn mower, and wack between the raised beds and all around them. It would have saved so much time if I had moved the raised beds further away from the shed and further away from each other, Best of luck to you this year!
haha – too late! I don’t normally mow but my husband already “nicely” pointed that out to me! Great tip for anyone else, though! :)
make sure u leave enough space between for lawn mower…I didnt…it makes it hard to keep the area between nice…
Nope, I didn’t. :( Oops!
I’ll have to try to remember to come back and read more. I would love to try raised garden beds. Did you not have to remove the grass before you put the soil in?
Beth – that will be in my next post but no I didn’t remove the grass. I put done weed mat which will kill the grass. I’ve also read that you can use cardboard boxes or a thick layer of newspapers too! Not having to dig up the grass was a big benefit to me because that is hard work!
We have 2 of these raised beds that we got from Home Depot last year. Love them. This year I added 1 cinder block raised beds too. Can’t wait to follow along on your gardening journey.
Thanks! :) I’m excited too!